Setting up a Novation Launchpad
To set up a Novation Launchpad MIDI controller with Ableton Live, follow the steps below. Additional set up information is available from Novation.
Launchpad is compatible with all Live editions (Intro/Standard/Suite) and comes bundled with a free Live Lite license. Learn more about getting started with Live Lite.
Launchpad X and Launchpad Mini MK3
The latest generation of Launchpad devices require Live 10.1.3 or later.
Launchpad S, MK2, Mini, and Pro and Launchpad MK1
Launchpad MK1 requires a USB driver to work. Launchpad S, MK2, Mini, and Pro are class compliant and do not require this driver.
- If using MK1, download the correct driver from Novation, otherwise skip to step 2.
- Connect the Launchpad to your computer and start Live. The correct Control Surface should already be automatically selected. In case this does not happen or you need to change it:
- Open Live's Preferences (CTRL+, / CMD+,) and show the MIDI/Sync tab.
- In an available Control Surface chooser, select the Launchpad script that matches your device. For Launchpad MK2 or Launchpad Pro, select the name of your device. For Launchpad MK1, Mini, and S, select "Launchpad."
- In the corresponding Input and Output choosers, select "Launchpad."
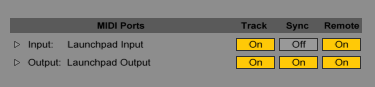
- Make sure the MIDI ports for the Launchpad are configured correctly. Enable "Track" and "Remote" for the Launchpad's inputs and outputs. Only enable the necessary ports.

- For Launchpad MK2 and Pro, also enable the output Sync port.
Tutorial Videos from Novation
Novation also have an excellent series of videos explaining how to set up the Launchpad with Live.